Writing Views¶§
View Basics¶§
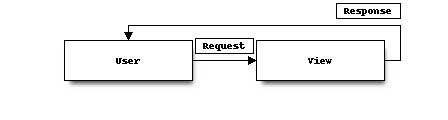
Django Views take an HTTP Request and return an HTTP Response to the user.
Any Python callable can be a view. The only hard and fast requirement is that it takes the request object (customarily named request) as its first argument. This means that a minimalist view is super simple:
from django.http import HttpResponse

def hello_world(request):
    return HttpResponse("Hello, World")
Of course, like most frameworks, Django also allows you to pass arguments to the view from the URL. We’ll cover this as we build up our application.
Listing Contacts¶§
We’ll start with a view that presents a list of contacts in the database.
The basic view implementation is shockingly brief. We can write the view in just a few lines in the views.py file in our contacts application.
from django.views.generic import ListView

from contacts.models import Contact


class ListContactView(ListView):

    model = Contact
The ListView that we subclass from is itself composed of several mixins that provide some behavior, and that composition gives us a lot of power without a lot of code. In this case we set model = Contact, which says that this view is going to list all the Contacts in our database.
Creating the Template¶§
Now that we’ve defined a URL for our list view, we can try it out. Django includes a server suitable for development purposes that you can use to easily test your project:
$ python manage.py runserver
Validating models...

0 errors found
Django version 1.4.3, using settings 'addressbook.settings'
Development server is running at http://127.0.0.1:8000/
Quit the server with CONTROL-C.
If you visit the http://localhost:8000/ in your browser, though, you’ll see an error: TemplateDoesNotExist.

Most of Django’s generic views (such as ListView which we’re using) have a predefined template name that they expect to find. We can see in this error message that this view was expecting to find contact_list.html, which is derived from the model name. Let’s go and create that.
By default Django will look for templates in applications, as well as in directories you specify in settings.TEMPLATE_DIRS. The generic views expect that the templates will be found in a directory named after the application (in this case contacts), and the filename will contain the model name (in this case contact_list.html). This works very well when you’re distributing a reusable application: the consumer can create templates that override the defaults, and they’re clearly stored in a directory associated with the application.
For our purposes, however, we don’t need that extra layer of directory structure, so we’ll specify the template to use explicitly, using the template_name property. Let’s add that one line to views.py.
from django.views.generic import ListView

from contacts.models import Contact


class ListContactView(ListView):

    model = Contact
    template_name = 'contact_list.html'
Create a templates subdirectory in our contacts application, and create contact_list.html there.
Contacts


  {% for contact in object_list %}
     class="contact">{{ contact }}

  {% endfor %}
Opening the page in the browser, we should see one contact there, the one we added earlier through the interactive shell.
Creating Contacts¶§
Adding information to the database through the interactive shell is going to get old fast, so let’s create a view for adding a new contact.
Just like the list view, we’ll use one of Django’s generic views. In views.py, we can add the new view:
from django.core.urlresolvers import reverse
from django.views.generic import CreateView
...
class CreateContactView(CreateView):

    model = Contact
    template_name = 'edit_contact.html'

    def get_success_url(self):
        return reverse('contacts-list')
Most generic views that do form processing have the concept of the “success URL”: where to redirect the user when the form is successfully submitted. The form processing views all adhere to the practice of POST-redirect-GET for submitting changes, so that refreshing the final page won’t result in form re-submission. You can either define this as a class property, or override the get_success_url() method, as we’re doing here. In this case we’re using the reverse function to calculate the URL of the contact list.
The template is slightly more involved than the list template, but not much. Our edit_contact.html will look something like this.
Add Contact
A few things to note:
- The
formin the context is the Django Form for our model. Since we didn’t specify one, Django made one for us. How thoughtful. - If we just write
{{ form }}we’ll get table rows; adding.as_ulformats the inputs for an unordered list. Try.as_pinstead to see what you get. - When we output the form, it only includes our fields, not the surrounding
tag or the submit button, so we have to add those. - The
{% csrf_token %}tag inserts a hidden input that Django uses to verify that the request came from your project, and isn’t a forged cross-site request. Try omitting it: you can still access the page, but when you go to submit the form, you’ll get an error. - We’re using the
urltemplate tag to generate the link back to the contact list. Note thatcontacts-listis the name of our view from the URL configuration. By usingurlinstead of an explicit path, we don’t have to worry about a link breaking.urlin templates is equivalent toreversein Python code.
You can configure the URL by adding the following line to our urls.py file:
url(r'^new$', contacts.views.CreateContactView.as_view(),
    name='contacts-new',),
Now you can go to http://localhost:8000/new to create new contacts.
To complete the story, let’s add a link to contact_list.html.
Testing Your Views¶§
So far our views have been pretty minimal: they leverage Django’s generic views, and contain very little of our own code or logic. One perspective is that this is how it should be: a view takes a request, and returns a response, delegating the issue of validating input to forms, and business logic to model methods. This is a perspective that I subscribe to. The less logic contained in views, the better.
However, there is code in views that should be tested, either by unit tests or integration tests. The distinction is important: unit tests are focused on testing a single unit of functionality. When you’re writing a unit test, the assumption is that everything else has its own tests and is working properly. Integration tests attempt to test the system from end to end, so you can ensure that the points of integration are functioning properly. Most systems have both.
Django has two tools that are helpful for writing unit tests for views: the Test Client and the RequestFactory. They have similar APIs, but approach things differently. The TestClient takes a URL to retrieve, and resolves it against your project’s URL configuration. It then creates a test request, and passes that request through your view, returning the Response. The fact that it requires you to specify the URL ties your test to the URL configuration of your project.
The RequestFactory has the same API: you specify the URL you want to retrieve and any parameters or form data. But it doesn’t actually resolve that URL: it just returns the Request object. You can then manually pass it to your view and test the result.
In practice, RequestFactory tests are usually somewhat faster than the TestClient. This isn’t a big deal when you have five tests, but it is when you have 500 or 5,000. Let’s look at the same test written with each tool.
from django.test.client import Client
from django.test.client import RequestFactory
...
from contacts.views import ListContactView
...
class ContactListViewTests(TestCase):
    """Contact list view tests."""

    def test_contacts_in_the_context(self):

        client = Client()
        response = client.get('/')

        self.assertEquals(list(response.context['object_list']), [])

        Contact.objects.create(first_name='foo', last_name='bar')
        response = client.get('/')
        self.assertEquals(response.context['object_list'].count(), 1)

    def test_contacts_in_the_context_request_factory(self):

        factory = RequestFactory()
        request = factory.get('/')

        response = ListContactView.as_view()(request)

        self.assertEquals(list(response.context_data['object_list']), [])

        Contact.objects.create(first_name='foo', last_name='bar')
        response = ListContactView.as_view()(request)
        self.assertEquals(response.context_data['object_list'].count(), 1)
Integration Tests¶§
Django 1.4 adds a new TestCase base class, the LiveServerTestCase. This is very much what it sounds like: a test case that runs against a live server. By default Django will start the development server for you when it runs these tests, but they can also be run against another server.
Selenium is a tool for writing tests that drive a web browser, and that’s what we’ll use for our integration tests. By using Selenium, you’re able to automate different browers (Chrome, Firefox, etc), and interact with your full application much as the user would. Before writing tests to use it, we’ll need to install the Python implementation.
(tutorial)$ pip install selenium
We’re going to write a couple of tests for our views:
- one that creates a Contact and makes sure it’s listed
- one that makes sure our “add contact” link is visible and linked on the list page
- and one that actually exercises the add contact form, filling it in and submitting it.
from django.test import LiveServerTestCase
from selenium.webdriver.firefox.webdriver import WebDriver
...
class ContactListIntegrationTests(LiveServerTestCase):

    @classmethod
    def setUpClass(cls):
        cls.selenium = WebDriver()
        super(ContactListIntegrationTests, cls).setUpClass()

    @classmethod
    def tearDownClass(cls):
        cls.selenium.quit()
        super(ContactListIntegrationTests, cls).tearDownClass()

    def test_contact_listed(self):

        # create a test contact
        Contact.objects.create(first_name='foo', last_name='bar')

        # make sure it's listed as   on the list
        self.selenium.get('%s%s' % (self.live_server_url, '/'))
        self.assertEqual(
            self.selenium.find_elements_by_css_selector('.contact')[0].text,
            'foo bar'
        )

    def test_add_contact_linked(self):

        self.selenium.get('%s%s' % (self.live_server_url, '/'))
        self.assert_(
            self.selenium.find_element_by_link_text('add contact')
        )

    def test_add_contact(self):

        self.selenium.get('%s%s' % (self.live_server_url, '/'))
        self.selenium.find_element_by_link_text('add contact').click()

        self.selenium.find_element_by_id('id_first_name').send_keys('test')
        self.selenium.find_element_by_id('id_last_name').send_keys('contact')
        self.selenium.find_element_by_id('id_email').send_keys('')

        self.selenium.find_element_by_id("save_contact").click()
        self.assertEqual(
            self.selenium.find_elements_by_css_selector('.contact')[-1].text,
            'test contact'
        )
Note that Selenium allows us to find elements in the page, inspect their state, click them, and send keystrokes. In short, it’s like we’re controlling the browser. In fact, if you run the tests now, you’ll see a browser open when the tests run.
In our example we’re using CSS Selectors to locate elements in the DOM, but you can also use Xpath. For many people it’s a matter of preference, but I’ve found that using CSS Selectors is often less brittle: if I change the markup, I’m likely to leave classes on important elements in place, even if their relative position in the DOM changes.
Review¶§
- Views take an HttpRequest and turn it into an HttpResponse
- Generic class-based views introduced with Django 1.3
- These let you create reusable, composable views
- URLs are defined in
urls.pyin your project - Naming URLs lets you calculate the URL to a view
- RequestFactory creates Requests for testing Views with
- LiveServerTestCase provides basis for writing integration tests